To implement Redis as easily as possible in Drupal 7, proceed as follows:
- First make sure you Activate Redis caching from the control panel
- Login in the backend. This can be done by generating a single sign-on link via drush.
drush uli -l ninefortwo.beYou type this in the root directory of the Drupal installation. Here you get a link that looks approximately like this:
https://ninefortwo.be/user/reset/1/1456307446/R022fU2OH1QEopq7PsxBXKzgk92Op0kfV_yKIXeY1EU/loginPlease note that this link is valid only once. If you logged out, you will have to generate a new link.
- Install the “Redis” module
- Once logged in, go to “Modules” => “Install new module”.


- Go to https://www.drupal.org/project/redis and please copy the link of the zip file of the latest release of Drupal 7.

- Then go back and paste this URL into the text field “Install from a URL” and click “Install”
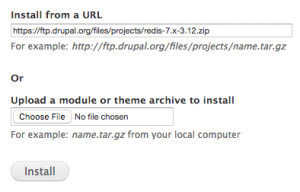

- Once logged in, go to “Modules” => “Install new module”.
- Activate the module
- Click “Modules” in the backend of Drupal. Now search for “Redis” from the list of modules.

- Now switch on the “Redis” module and click “Save settings” (button on the left bottom)

- Click “Modules” in the backend of Drupal. Now search for “Redis” from the list of modules.
- Adjusting the configuration of the Redis module
- Change to the sites/default/ directory.
- Add the following to the bottom of the file settings.php:
/* Redis config
 * Please leave the settings below untouched
 */
  $conf['cache_backends'][]            = 'sites/all/modules/redis/redis.autoload.inc';
  $conf['cache_class_cache']           = 'Redis_Cache';
  $conf['cache_class_cache_menu']      = 'Redis_Cache';
  $conf['cache_class_cache_bootstrap'] = 'Redis_Cache';
  $conf['lock_inc'] = 'sites/all/modules/redis/redis.lock.inc';
  $conf['path_inc'] = 'sites/all/modules/redis/redis.path.inc';
  $conf['redis_client_host'] = ‘250.250.250.1';
  $conf['redis_client_port'] = 10000;
  $conf['redis_client_password'] = "XD23SggF";
Here you need to replace the IP address, port and password, of course, by the Redis IP, port number and password.
Checking Redis
Then check if the Redis Cache is being correctly filled. This is done as follows via the Redis-CLI:
Execute this command:
redis-cli -h redisipadress -p redisportnumber
Example:
redis-cli -h 250.250.250.1 -p 10000
This is what will appear
250.250.250.1:10000>
Now enter the word “AUTH” followed by the password of the Redis instance and press enter. This looks like this:
250.250.250.1:10000> AUTH ***************
You should now get an “OK” back. Respond with executing this command: “keys *” like so:
250.250.250.1:10000> keys *
If Redis is configured properly, you see an output similar to the following:
1) "zc:k:f01_B95179D8427D4CD3A6E015530E9E4"
2) "zc:ti:f01_BLOCK_SLIDE2"
3) "zc:k:f01_Zend_LocaleC_nl_NL_country_MR"
4) "zc:ti:f01_BLOCK_CATEGORY_ABOVE_EMPTY_COLLECTION"
5) "zc:k:f01_A9B2A0BB16F05FAA2371C0A5FB79E"
6) "zc:k:f01_CMS_BLOCK_BLOCK_LEFT_TOP_1_1"
7) "zc:k:f01_Zend_LocaleC_sv_SE_language_sv"
587